We all know very well that the Firewall simply helps us to protect our computer systems from network threats and the default behavior of this security system is to analyze all the connections of the programs, processes, and services of a computer and decide which are reliable connections and which ones can be suspicious to allow or block traffic depending on it. But, now, here in this explanatory tutorial we will simply show you a tutorial in which we will tell how to disable the firewall on Windows 8, 8.1, and 10 operating system.
How To Disable Firewall On Windows 8, 8.1, & 10 Operating System
A Firewall simply helps us to protect our computer systems from network threats and the default behavior of this security system is to analyze all the connections of the programs, processes, and services of a computer and decide which are reliable connections and which ones can be suspicious to allow or block traffic depending on it.The tech giant Microsoft’s well-known computer operating system, of course, I am talking about Windows, by default, comes with a very simple firewall that is enabled by default with the installation of the system so that users do not have to worry about looking for one, activate it and configure it.
However, the Windows firewall is quite poor in functions and in many cases can generate more problems than solutions to its users, especially with the use of P2P programs that need to use certain ports and by default, the Windows Firewall simply blocks them to prevent the correct operation of these systems.
But, don’t worry, as it is possible to disable the Windows firewall easily. Hence, in this article, we are going to show you how to deactivate the Firewall of Windows 8, 8.1, & 10 Operating System of the tech giant Microsoft.
To disable the firewall in Windows 8, 8.1, & 10, we must enter what is commonly known as the “control panel” of Windows. As due to the absence of the start menu in Windows 8 and 8.1 operating systems we must have to follow another way until we reach the firewall settings. So, now without wasting much time let’s get started and explore the whole article in which we have mentioned the tutorial below.
- First of all, we must open the Modern UI menu on the right side of the screen by moving the mouse to one of the corners and moving it up or down (in case if you have Windows 8 or 8.1).
- Then simply we have to click on the “Search” bar or button.
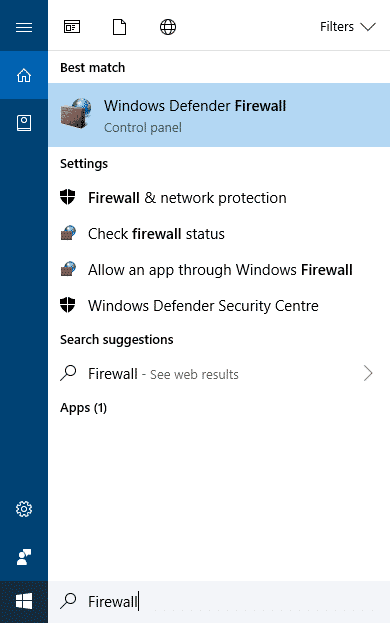
- Now on the search bar simply write “Firewall” so that Windows shows us all the elements related to this term.

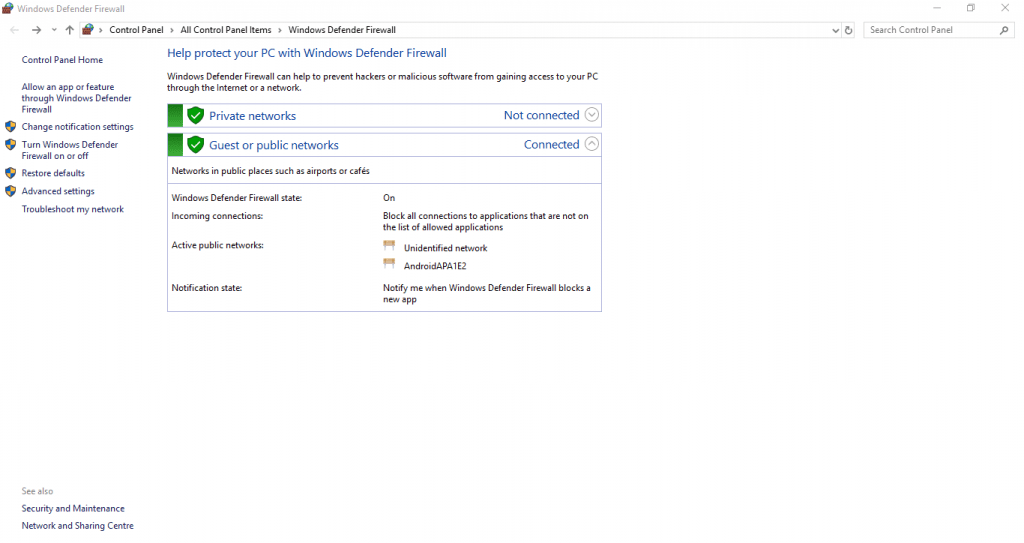
- Now simply select the option “Windows Defender Firewall,” and it will show us a window similar to the following one.

- After the above step now simply click on the “Turn Windows Defender Firewall on or off” option which is available on the left side of the window.
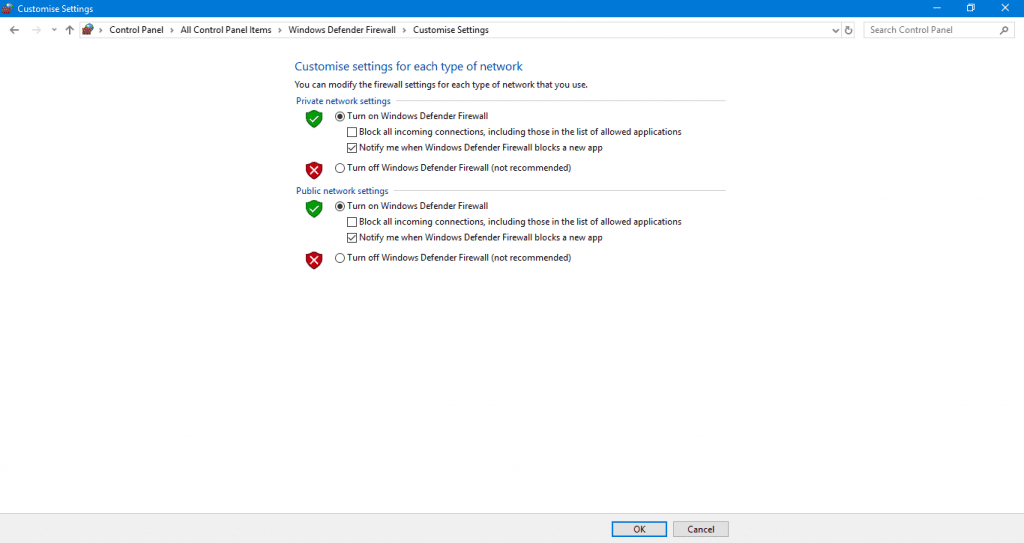
- Now from here in this window, you can simply “activate or deactivate the windows firewall”.

- Hence, in this window, you have to simply check the option “disable Windows firewall” in both private network and the public network and automatically it will stop working the firewall, now we will have the direct connection to the internet.
- That’s it now you are done.
So, what do you think about this? Simply share all your views and thoughts in the comment section below. And if you liked this tutorial then do not forget to share this article with your friends and family.
Comments
Post a Comment